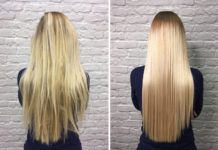
About 9 months ago, when I was sick to death of pulling strands of grey hair out of my head every morning, I decided to take the plunge and get my hair highlighted. I had been toying with the idea for years, but I was so scared my hair would end up looking streaky and fake that I always chickened out at the last minute.
The good news is that my hairdresser is fully aware of how big a wimp I am, and when I finally worked up the courage to let him add a little color to my hair, he made sure to match it as closely to my natural color as he could.
I remember feeling so incredibly relieved when I left the salon that day, and if I’m going to be completely honest, I also felt a little bit disappointed I hadn’t trusted him and gone for something a little more drastic. So with each passing month, I’ve allowed him to add a bit more diversity to my locks, and while I have enjoyed the change in my look, my recent round of highlights left my hair dry and damaged with horrible split ends framing my face.
I wasn’t pleased.
But I’m nothing if I’m not resourceful, and I’ve been spending A LOT of time chatting with different hairdressers and researching different split end remedies online, and I’m pleased to tell you my hair looks and feels a lot healthier than it did a couple of months ago. And since I know I’m not the only woman who has spent the last several weeks crying over brittle, damaged hair, today I’m sharing 8 of my best tips to teach YOU how to get rid of split ends.
1. GET A HAIR TRIM
Before you start making changes to your hair routine, I highly suggest getting a trim so you can remove as much of the damaged hair as you can. For me, this wasn’t a completely realistic strategy as I can only cut so much off of the front layer of my hair, but I’ve made sure the split ends from the rest of my hair have been removed. Not only does this allow me to work with a clean slate to ensure I don’t damage my hair further, but it also makes my hair look and feel healthier.
2. BRUSH BEFORE YOU SHOWER
Before you hop into the shower, make sure to brush through your hair with a wide-toothed comb to avoid unnecessary breakage while applying shampoo and conditioner. I find this particularly important when I wake up in the morning and my hair is full of knots (I have no idea what I do in my sleep?), or when I have a lot of product in my hair. Either way, the key is to make sure your hair is smooth before you start working with it.
3. DON’T TOWEL DRY
I believe Nicole Guerriero was the first person to share this little trick with me, and I have since had countless hairdressers tell me that towel drying your hair not only leads to breakage, but can also make your hair look frizzy. So instead of wrapping a bath towel around my hair while I’m doing my makeup, I use one of my husband’s old tee-shirts instead. It sounds silly, but the material is flat and super absorbent, so it removes all of the water from my hair without causing damage, removing moisture, or causing breakage. It took a little getting used to at first, but I find my hair dries so much faster when wrapped in an old tee-shirt, which cuts down on the amount of time I use my hairdryer. I’ve heard microfiber towels like the Turbie Twist Microfiber Super Absorbent Hair Towel are also very effective.
4. USE A WIDE-TOOTHED COMB
Wet hair is much more fragile than dry hair, so most hairdressers would advise that you avoid brushing or combing your hair until it’s completely dry, but we all know that is pretty unrealistic. So if you do need to brush your hair when it’s wet, always opt for a wide-toothed comb. Not only will this make the process of detangling your hair easier, but it will also prevent breakage, which we want to avoid!
5. APPLY THE RIGHT PRODUCTS
When I first started to notice I was developing a problem with split ends, I stopped using all hair products that make my hair sticky (think: mousse and hair spray) as I find that, even with a wide-toothed comb, they make my hair more difficult to brush through, which inevitably causes breakage and damage. I also started to use a leave-in conditioner every time I wash my hair (I love the TRESemme Leave-In Conditioning Treatment Split Remedy), and have noticed a HUGE difference in not only how smooth my hair looks and feels, but also in how easily I can run my hands through it. I also apply a leave-in oil treatment (I swear by Moroccanoil) to further condition the ends and give my hair a little extra shine, and I am ADAMANT about using a heat protector (I prefer the CHI 44 Iron Guard Thermal Protecting Conditioner) before I use any hot tools on my hair.
6. USE THE CONCENTRATOR ON YOUR HAIR DRYER
I have tossed away every single hair dryer nozzle and concentrator I’ve ever owned, but after my hairdresser asked me to demonstrate how I dry my hair each morning, he explained that these attachments not only control the flow of the hot air during the drying process, but also ensure you aren’t applying hot air (and hot tools!) directly to your hair. Admittedly, this has been a bit of an adjustment for me as I find it takes longer to dry my hair, but when I realized just how much heat I was subjecting my hair too, I knew I had to make the change!
7. DON’T SHAMPOO EVERY DAY
Ugh. This one is challenging for me as I don’t like how my hair feels and looks when it’s not freshly washed, but thanks to these helpful tips for prolonging a hair wash, I’m slowing learning how I can still look glamorous without shampooing my hair each morning. I have also become a fan of the messy bun look as I find it compliments the dirty hair look well and keeps my hair off my face.
8. TIE YOUR HAIR BACK IN WINDY WEATHER
If you’ve ever brushed your hair after a spending an extended period of time in windy conditions, you are well aware that the elements can wreak havoc on your hair and cause significant damage and breakage. So next time the weatherman is calling for wild weather, give one of these easy updos a try!


